Photoshop制作絢麗的彩色光束飄帶
2022-12-26 07:02:14
來源/作者: /
己有:11人學習過
14、新建一個圖層,用鋼筆勾出邊緣的高光選區,如圖15,填充黃色,效果如圖16。

![](https://img.lvups.com/d/file/bigpic/2022/12/26/q0dx3r2sz2u.jpg)
<圖15>
![](https://img.lvups.com/d/file/bigpic/2022/12/26/0dh1oytesw4.jpg)
<圖16>
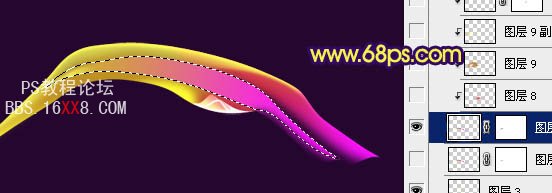
15、新建一個圖層,用鋼筆勾出下圖所示的選區,拉上橙紅色至紫色線性漸變。
![](https://img.lvups.com/d/file/bigpic/2022/12/26/mm1g2kw4x0b.jpg)
<圖17>
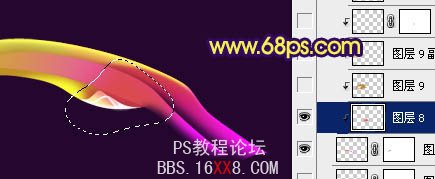
16、新建一個圖層,按Ctrl + Alt + G 與前一圖層編組,再在當前圖層下面新建一個圖層,用鋼筆勾出下圖所示的選區,羽化6個像素后填充紅色。
![](https://img.lvups.com/d/file/bigpic/2022/12/26/b0q0gdymo3j.jpg)
<圖18>
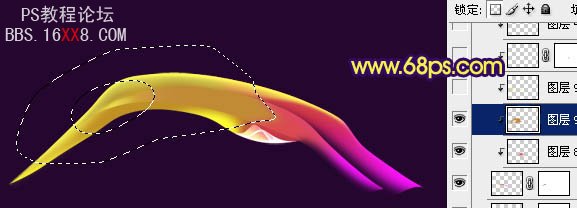
17、同上的方法用鋼筆勾出下圖所示的選區,羽化5個像素后填充暗黃色。
![](https://img.lvups.com/d/file/bigpic/2022/12/26/2owtpbzjomi.jpg)
<圖19>
![](https://img.lvups.com/d/file/bigpic/2022/12/26/q0dx3r2sz2u.jpg)
<圖15>
![](https://img.lvups.com/d/file/bigpic/2022/12/26/0dh1oytesw4.jpg)
<圖16>
15、新建一個圖層,用鋼筆勾出下圖所示的選區,拉上橙紅色至紫色線性漸變。
![](https://img.lvups.com/d/file/bigpic/2022/12/26/mm1g2kw4x0b.jpg)
<圖17>
16、新建一個圖層,按Ctrl + Alt + G 與前一圖層編組,再在當前圖層下面新建一個圖層,用鋼筆勾出下圖所示的選區,羽化6個像素后填充紅色。
![](https://img.lvups.com/d/file/bigpic/2022/12/26/b0q0gdymo3j.jpg)
<圖18>
17、同上的方法用鋼筆勾出下圖所示的選區,羽化5個像素后填充暗黃色。
![](https://img.lvups.com/d/file/bigpic/2022/12/26/2owtpbzjomi.jpg)
<圖19>
下一篇:制作超酷透明MSN娃娃