朱古力餅干字
2022-12-25 14:17:16
來(lái)源/作者: /
己有:28人學(xué)習(xí)過(guò)
9、回到文字圖層,把文字圖層顯示處理,把文字復(fù)制一層,雙擊圖層調(diào)出圖層樣式,參數(shù)設(shè)置如圖17-19,效果如圖20。

<圖17>

<圖18>

<圖19>

<圖20>
10、再回到原文字圖層,把文字復(fù)制一層,按右鍵柵格化圖層,然后把文字向右和向上稍微移幾個(gè)像素,如圖21。

<圖21> 11、執(zhí)行:濾鏡 > 扭曲 > 波紋,參數(shù)設(shè)置如圖22。
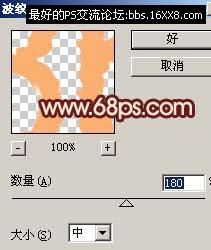
<圖22>
12、雙擊圖層調(diào)出圖層樣式,參數(shù)設(shè)置如圖23-25,確定后完成最終效果。

<圖23>

<圖24>

<圖25>
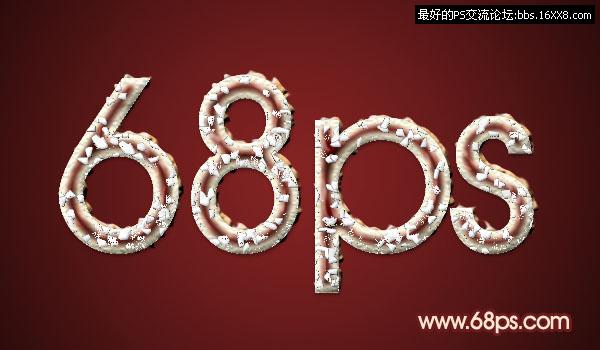
<圖26>
相關(guān)推薦

融化的巧克力字

巧克力字,設(shè)計(jì)巧克力餅干形狀的食物

餅干字,設(shè)計(jì)可愛的夾心餅干字教程

簡(jiǎn)單可愛的奶油巧克力字...

彩繪藝術(shù)字, PS液化工具制作彩繪背景設(shè)計(jì)教程

Photoshop制作非常流行的金沙立體字,細(xì)膩的金沙字體,金粉字。

Photoshop制作金色的海報(bào)標(biāo)題文字教程

Photoshop使用筆刷制作書法藝術(shù)字教程


