photoshop如何做金屬質感圖標
2022-12-26 14:50:55
來源/作者: /
己有:27人學習過
作者Adam0799 出處:昵圖網
最終效果
[table=98%,rgb(211, 211, 211)][tr][td]

[/td][/tr][/table]以下是詳細的photoshop教程步驟:
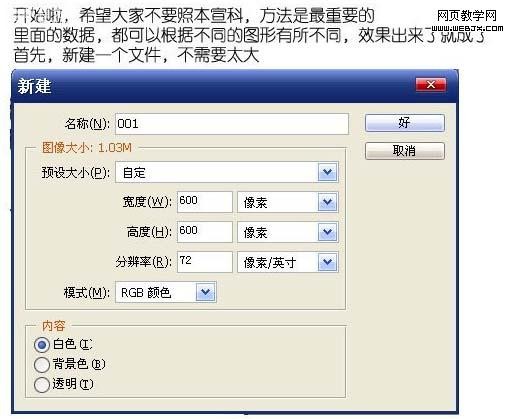
[table=98%,rgb(211, 211, 211)][tr][td]1、新建一個600 * 600 像素的文件,如下圖。[/td][/tr][/table]
[table=98%,rgb(211, 211, 211)][tr][td]
[/td][/tr][/table]
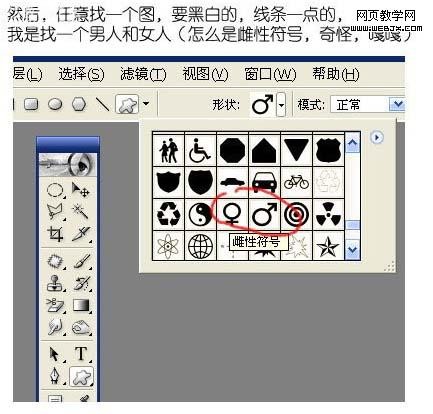
[table=98%,rgb(211, 211, 211)][tr][td]2、選擇子定義形狀工具,選出自己喜愛的圖形。[/td][/tr][/table]
[table=98%,rgb(211, 211, 211)][tr][td]
[/td][/tr][/table]
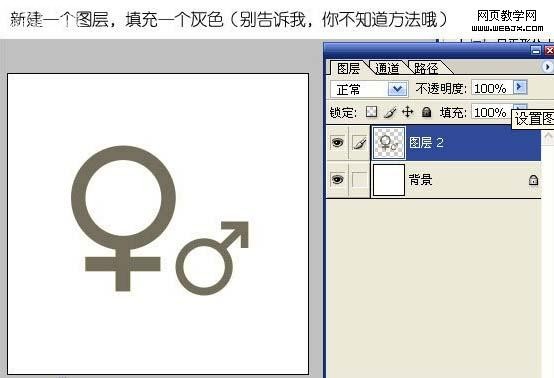
,[table=98%,rgb(211, 211, 211)][tr][td]3、新建一個圖層,拉出圖形效果,顏色選擇灰色,如下圖。[/td][/tr][/table]
[table=98%,rgb(211, 211, 211)][tr][td]
[/td][/tr][/table]
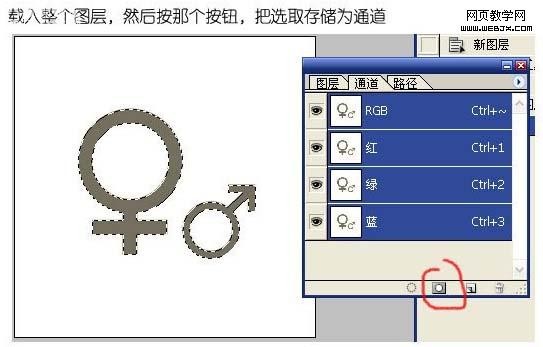
[table=98%,rgb(211, 211, 211)][tr][td]4、按Ctrl 點圖層面板縮略圖調出選區,然后點通道面板,點下面的蒙蔽按鈕保存選區。[/td][/tr][/table]
[table=98%,rgb(211, 211, 211)][tr][td]
[/td][/tr][/table]
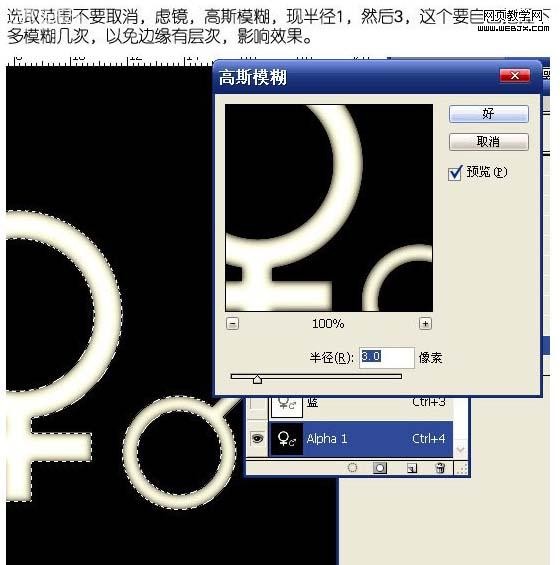
[table=98%,rgb(211, 211, 211)][tr][td]5、保持選區不變,點新建的通道,執行:濾鏡 模糊 高斯模糊,數值為1,確定后再執行一次模糊操作,數值為3,這個要自己把握下,多次模糊幾次以免邊緣有層次,影響效果。[/td][/tr][/table]
[table=98%,rgb(211, 211, 211)][tr][td]
[/td][/tr][/table]
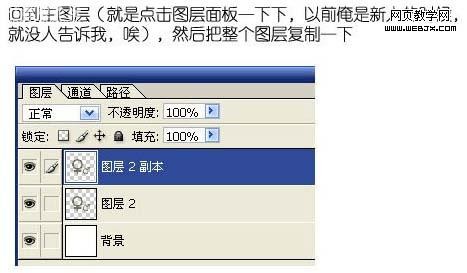
,[table=98%,rgb(211, 211, 211)][tr][td]6、回到圖層,然后把整個圖層復制一下。[/td][/tr][/table]
[table=98%,rgb(211, 211, 211)][tr][td]
[/td][/tr][/table]
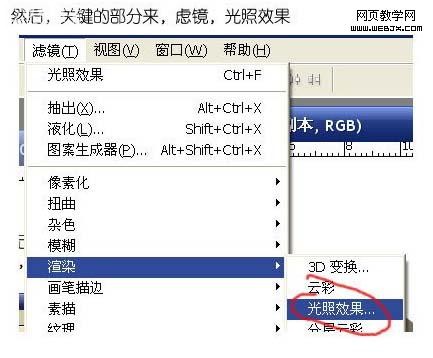
[table=98%,rgb(211, 211, 211)][tr][td]7、然后對副本執行:濾鏡 渲染 光照效果。[/td][/tr][/table]
[table=98%,rgb(211, 211, 211)][tr][td]
[/td][/tr][/table]
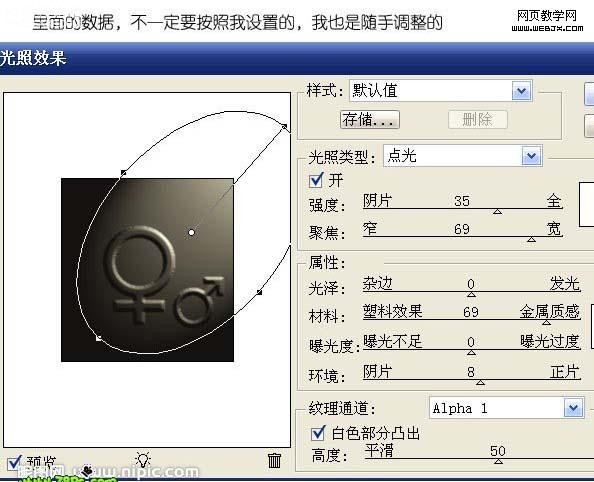
[table=98%,rgb(211, 211, 211)][tr][td]8、紋理通道選擇剛才我們新建的通道,其它參數設置如下圖。[/td][/tr][/table]
[table=98%,rgb(211, 211, 211)][tr][td]
[/td][/tr][/table]
,[table=98%,rgb(211, 211, 211)][tr][td]9、按Ctrl + M 調整曲線,把里面的黑白突出一下,參數設置如下圖。[/td][/tr][/table]
[table=98%,rgb(211, 211, 211)][tr][td]

[/td][/tr][/table]
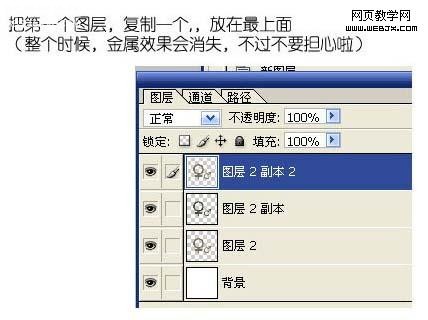
[table=98%,rgb(211, 211, 211)][tr][td]10、把第一個圖層復制一個,放在最上面(這個時候,金屬效果會效果,不過不要擔心)。[/td][/tr][/table]
[table=98%,rgb(211, 211, 211)][tr][td]
[/td][/tr][/table]
[table=98%,rgb(211, 211, 211)][tr][td]11、下面我們就是把金屬效果加強點。執行:濾鏡 素描 鉻黃。[/td][/tr][/table]
[table=98%,rgb(211, 211, 211)][tr][td]

[/td][/tr][/table][table=98%,rgb(211, 211, 211)][tr][td]12、參數設置如下圖。[/td][/tr][/table]
最終效果
[table=98%,rgb(211, 211, 211)][tr][td]
[/td][/tr][/table]以下是詳細的photoshop教程步驟:
[table=98%,rgb(211, 211, 211)][tr][td]1、新建一個600 * 600 像素的文件,如下圖。[/td][/tr][/table]
[table=98%,rgb(211, 211, 211)][tr][td]
[/td][/tr][/table]
[table=98%,rgb(211, 211, 211)][tr][td]2、選擇子定義形狀工具,選出自己喜愛的圖形。[/td][/tr][/table]
[table=98%,rgb(211, 211, 211)][tr][td]
[/td][/tr][/table]
,[table=98%,rgb(211, 211, 211)][tr][td]3、新建一個圖層,拉出圖形效果,顏色選擇灰色,如下圖。[/td][/tr][/table]
[table=98%,rgb(211, 211, 211)][tr][td]
[/td][/tr][/table]
[table=98%,rgb(211, 211, 211)][tr][td]4、按Ctrl 點圖層面板縮略圖調出選區,然后點通道面板,點下面的蒙蔽按鈕保存選區。[/td][/tr][/table]
[table=98%,rgb(211, 211, 211)][tr][td]
[/td][/tr][/table]
[table=98%,rgb(211, 211, 211)][tr][td]5、保持選區不變,點新建的通道,執行:濾鏡 模糊 高斯模糊,數值為1,確定后再執行一次模糊操作,數值為3,這個要自己把握下,多次模糊幾次以免邊緣有層次,影響效果。[/td][/tr][/table]
[table=98%,rgb(211, 211, 211)][tr][td]
[/td][/tr][/table]
,[table=98%,rgb(211, 211, 211)][tr][td]6、回到圖層,然后把整個圖層復制一下。[/td][/tr][/table]
[table=98%,rgb(211, 211, 211)][tr][td]
[/td][/tr][/table]
[table=98%,rgb(211, 211, 211)][tr][td]7、然后對副本執行:濾鏡 渲染 光照效果。[/td][/tr][/table]
[table=98%,rgb(211, 211, 211)][tr][td]
[/td][/tr][/table]
[table=98%,rgb(211, 211, 211)][tr][td]8、紋理通道選擇剛才我們新建的通道,其它參數設置如下圖。[/td][/tr][/table]
[table=98%,rgb(211, 211, 211)][tr][td]
[/td][/tr][/table]
,[table=98%,rgb(211, 211, 211)][tr][td]9、按Ctrl + M 調整曲線,把里面的黑白突出一下,參數設置如下圖。[/td][/tr][/table]
[table=98%,rgb(211, 211, 211)][tr][td]
[/td][/tr][/table]
[table=98%,rgb(211, 211, 211)][tr][td]10、把第一個圖層復制一個,放在最上面(這個時候,金屬效果會效果,不過不要擔心)。[/td][/tr][/table]
[table=98%,rgb(211, 211, 211)][tr][td]
[/td][/tr][/table]
[table=98%,rgb(211, 211, 211)][tr][td]11、下面我們就是把金屬效果加強點。執行:濾鏡 素描 鉻黃。[/td][/tr][/table]
[table=98%,rgb(211, 211, 211)][tr][td]
[/td][/tr][/table][table=98%,rgb(211, 211, 211)][tr][td]12、參數設置如下圖。[/td][/tr][/table]
上一篇:ps設計倒計時圖標
相關推薦

ps cs6設計龍主題LOGO教程

photoshop制作國外彩虹Logo教程

火焰Logo教程

ps制作漂亮清新的LOGO教程

Photoshop制作清涼的水中展示網頁

Photoshop制作大氣的網頁設計主頁

陰影教程,超詳細的各種陰影的制作方法

Photoshop制作炫酷的PK類網站Banner


