photoshop合成雪中女王
2022-12-25 21:45:12
來源/作者: /
己有:44人學習過
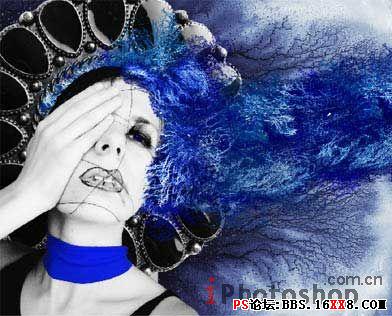
Place it on a layer under the girl's one. Mark it out and erase the background which it was situated on and then decolorize the layer.
放置在MM層下面,使用橡皮擦將胸針外的地方擦除,并將胸針大小調整到剛好和MM腦袋大小吻合當作MM的皇冠。
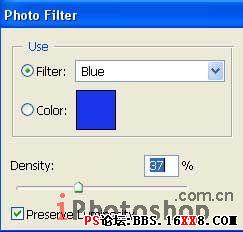
Make the brooch look bluer, applying Image -Adjustments -Photo Filter.
點擊圖像-調整-圖片濾鏡將胸針的色調也變成藍色。
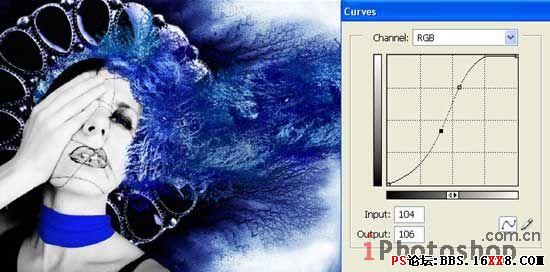
Get back to the background's layer and work with the color: make it profounder: (Curves)
回到背景層,調整色彩曲線,使得背景色更深邃一些。
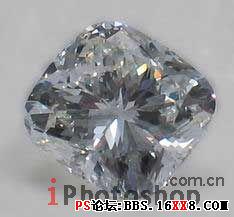
Insert on a new layer the picture of a diamond.
新建層,添加一款鉆石的圖片。
標簽(TAG) 照片合成
上一篇:利用相關素材制作鬼魅效果
下一篇:噴濺效果,制作噴濺效果的人像
相關推薦

簡易畫貓頭鷹的步驟 畫貓頭鷹的簡

幼兒簡筆畫烏鴉的畫法 教你如何畫

如何簡單的畫一條魚 5步畫魚簡筆畫

ps cs6做鉚釘效果文字

如何用PS把渾濁的風景照片調出通透清晰

PS商業修圖師對人物頭發進行精修教程

如何用PS打造出明亮而有神的眼睛效果

PS商業修圖給人像增強光影質感的方法介紹


