利用PhotoShop制作水面材質
2022-12-26 08:10:01
來源/作者: /
己有:4人學習過
利用PhotoShop制作水面材質
本則教程中我們將學習如何利用PS制作水面材質。

創建300x300畫布并用黑色填充。
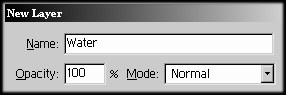
創建新的圖層并命名為“水面”,用黑色填充該層。


將白色設為前景色,黑色設為背景色。


濾鏡 >> 素描 >> 鉻黃。
細節:10
平滑度:7

消退(CTRL SHIFT F)。
不透明度:50%
模式:正常
再次應用鉻黃濾鏡(CTRL F),并消退(CTRL SHIFT F)。
不透明度:30%
模式:正常

![]()
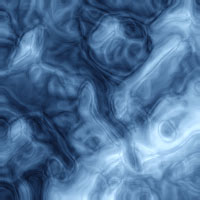
本則教程中我們將學習如何利用PS制作水面材質。
創建300x300畫布并用黑色填充。
創建新的圖層并命名為“水面”,用黑色填充該層。
將白色設為前景色,黑色設為背景色。
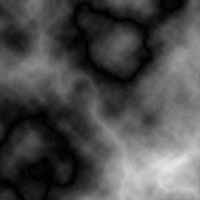
濾鏡 >> 渲染 >> 分層云彩。
按下CTRL F兩次,應用分層云彩濾鏡三次。
濾鏡 >> 素描 >> 鉻黃。
細節:10
平滑度:7
消退(CTRL SHIFT F)。
不透明度:50%
模式:正常
再次應用鉻黃濾鏡(CTRL F),并消退(CTRL SHIFT F)。
不透明度:30%
模式:正常
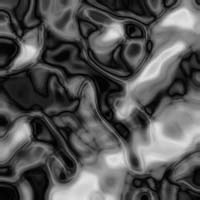
圖像 >> 調整 >> 色彩平衡。
色階:-50 0 50
色調平衡:中間調
圖像 >> 調整 >> 亮度/對比度。
亮度: 25
對比度: 25
下一篇:矢量效果,設計一張插畫風格海報
相關推薦

ps 濾鏡《理論講解》

ps筆刷濾鏡工具安裝教程
ps 濾鏡的選擇技巧
ps中濾鏡/樣式的33條技巧

圖片變清晰,使用PS讓模糊圖片變清晰的方法教程

PS調出晶瑩潔白膚色商業人像照片效果

PS調出唯美金黃色樹葉背景甜美女生照片

調出高清質感暗色草原風景圖片的PS教程


