photoshop做臉部連接線效果
2022-12-25 21:54:26
來源/作者: /
己有:8人學習過
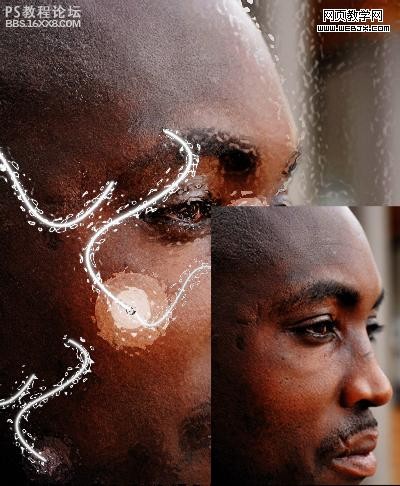
最終效果。
![](https://img.lvups.com/d/file/bigpic/2022/12/25/kio4adsjhw4.jpg)
素材
![](https://img.lvups.com/d/file/bigpic/2022/12/25/otwk4bard1m.jpg)
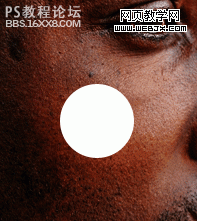
以下是詳細的photoshop教程步驟:Step 2:新建圖層繪制一個白色的圓。
![](https://img.lvups.com/d/file/bigpic/2022/12/25/nmim1ceh2pt.gif)
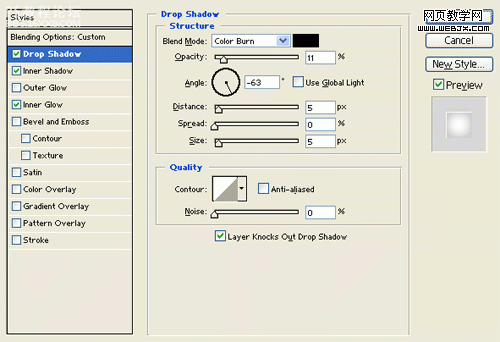
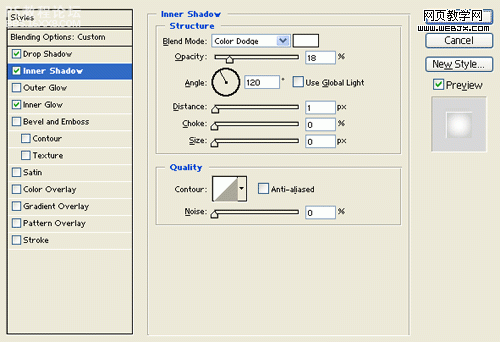
Step 3:添加圖層樣式,最后把圖層模式設置為柔光。
![](https://img.lvups.com/d/file/bigpic/2022/12/25/ty1tx0uhkuf.gif)
![](https://img.lvups.com/d/file/bigpic/2022/12/25/uwd2yiby4wq.gif)
![](https://img.lvups.com/d/file/bigpic/2022/12/25/2eyievvdmto.gif)
效果如下。
![](https://img.lvups.com/d/file/bigpic/2022/12/25/sf1njhjrdie.gif)
,Step 4:再繪制一個39 x 39 px大小白色的圓,不透明度調整到49%,然后繪制一個小的黑色的圓。
![](https://img.lvups.com/d/file/bigpic/2022/12/25/3x1bnflg1xe.gif)
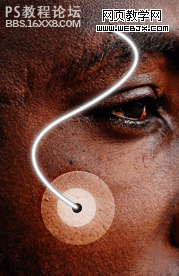
Step 5:選擇一個大小為 6px硬筆刷,創建一個新圖層,然后使用鋼筆繪制一個路徑,然后右擊描邊路徑
![](https://img.lvups.com/d/file/bigpic/2022/12/25/q2ekwtw5dy1.gif)
效果如下
![](https://img.lvups.com/d/file/bigpic/2022/12/25/xsrd0njhifg.gif)
Step 6:復制圖層,然后高斯模糊
![](https://img.lvups.com/d/file/bigpic/2022/12/25/uzsnb1oy5tz.gif)
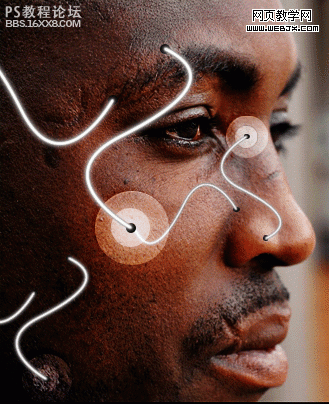
Step 7:繪制一些其他效果。
![](https://img.lvups.com/d/file/bigpic/2022/12/25/3l4ofd4miqo.gif)
![](https://img.lvups.com/d/file/bigpic/2022/12/25/kio4adsjhw4.jpg)
素材
![](https://img.lvups.com/d/file/bigpic/2022/12/25/otwk4bard1m.jpg)
以下是詳細的photoshop教程步驟:Step 2:新建圖層繪制一個白色的圓。
![](https://img.lvups.com/d/file/bigpic/2022/12/25/nmim1ceh2pt.gif)
Step 3:添加圖層樣式,最后把圖層模式設置為柔光。
![](https://img.lvups.com/d/file/bigpic/2022/12/25/ty1tx0uhkuf.gif)
![](https://img.lvups.com/d/file/bigpic/2022/12/25/uwd2yiby4wq.gif)
![](https://img.lvups.com/d/file/bigpic/2022/12/25/2eyievvdmto.gif)
效果如下。
![](https://img.lvups.com/d/file/bigpic/2022/12/25/sf1njhjrdie.gif)
,Step 4:再繪制一個39 x 39 px大小白色的圓,不透明度調整到49%,然后繪制一個小的黑色的圓。
![](https://img.lvups.com/d/file/bigpic/2022/12/25/3x1bnflg1xe.gif)
Step 5:選擇一個大小為 6px硬筆刷,創建一個新圖層,然后使用鋼筆繪制一個路徑,然后右擊描邊路徑
![](https://img.lvups.com/d/file/bigpic/2022/12/25/q2ekwtw5dy1.gif)
效果如下
![](https://img.lvups.com/d/file/bigpic/2022/12/25/xsrd0njhifg.gif)
Step 6:復制圖層,然后高斯模糊
![](https://img.lvups.com/d/file/bigpic/2022/12/25/uzsnb1oy5tz.gif)
Step 7:繪制一些其他效果。
![](https://img.lvups.com/d/file/bigpic/2022/12/25/3l4ofd4miqo.gif)
上一篇:液體效果,設計噴濺的運動鞋效果
下一篇:ps動漫攝影后期處理實例