photosohp制作紋身特效
2022-12-26 18:32:50
來源/作者: /
己有:27人學習過
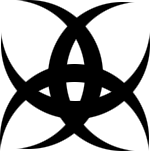
photosohp制作紋身特效1、首先創建紋身圖案。新建一300 x 300 的畫布,背景為透明。
使用橢圓選取工具創建圓形選區,并用黑色填充。使用→鍵移動選區直到形成月牙型時“Del”。

![](https://img.lvups.com/d/file/bigpic/2022/12/26/yp33mzf40ip.gif)
復制該層并利用自由變換合成如下圖形。
![](https://img.lvups.com/d/file/bigpic/2022/12/26/i53lhbf1jt3.gif)
合并可見圖層,按下Crtr并單擊該圖層獲得紋身選區。
復制。
打開人物圖片,并將紋身粘貼到該圖片。
![](https://img.lvups.com/d/file/bigpic/2022/12/26/1cycaei0wqa.gif)
自由變換,調整紋身大小和位置。
圖層 >> 圖層樣式 >> 混合選項,
混合模式:疊加
不透明度:80%
![](https://img.lvups.com/d/file/bigpic/2022/12/26/oapahxh52gi.gif)
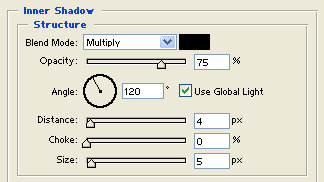
內陰影,
混合模式:正片疊底。
![](https://img.lvups.com/d/file/bigpic/2022/12/26/uvovdfmp0oz.gif)
顏色疊加,
混合模式:正常
![](https://img.lvups.com/d/file/bigpic/2022/12/26/ny0ed00yqyr.gif)
將紋身層不透明度設為“80%”,混合模式為“疊加”。
![](https://img.lvups.com/d/file/bigpic/2022/12/26/titsjp1xkbt.gif)
最終效果:
簡單的,我們教你,深奧的,你來分享
使用橢圓選取工具創建圓形選區,并用黑色填充。使用→鍵移動選區直到形成月牙型時“Del”。
![](https://img.lvups.com/d/file/bigpic/2022/12/26/yp33mzf40ip.gif)
復制該層并利用自由變換合成如下圖形。
![](https://img.lvups.com/d/file/bigpic/2022/12/26/i53lhbf1jt3.gif)
合并可見圖層,按下Crtr并單擊該圖層獲得紋身選區。
復制。
打開人物圖片,并將紋身粘貼到該圖片。
![](https://img.lvups.com/d/file/bigpic/2022/12/26/1cycaei0wqa.gif)
自由變換,調整紋身大小和位置。
圖層 >> 圖層樣式 >> 混合選項,
混合模式:疊加
不透明度:80%
![](https://img.lvups.com/d/file/bigpic/2022/12/26/oapahxh52gi.gif)
內陰影,
混合模式:正片疊底。
![](https://img.lvups.com/d/file/bigpic/2022/12/26/uvovdfmp0oz.gif)
顏色疊加,
混合模式:正常
![](https://img.lvups.com/d/file/bigpic/2022/12/26/ny0ed00yqyr.gif)
將紋身層不透明度設為“80%”,混合模式為“疊加”。
![](https://img.lvups.com/d/file/bigpic/2022/12/26/titsjp1xkbt.gif)
最終效果:
![](https://img.lvups.com/d/file/bigpic/2022/12/26/0zzo5wcewnj.gif)
上一篇:色彩知識,講解游戲中的色彩運用